First, connect to Ubuntu Live with SSH:
sudo apt-get update
sudo apt-get install ssh
sudo passwd ubuntu
List disks and partitions:
sudo lsblk -o NAME,FSTYPE,SIZE,MOUNTPOINT,LABEL
First, connect to Ubuntu Live with SSH:
sudo apt-get update
sudo apt-get install ssh
sudo passwd ubuntu
List disks and partitions:
sudo lsblk -o NAME,FSTYPE,SIZE,MOUNTPOINT,LABEL
sudo add-apt-repository ppa:ubuntu-toolchain-r/test
sudo apt update
sudo apt install gcc-13 g++-13
ll /usr/bin/gcc-13
ll /usr/bin/g++-13
update-alternatives --display gcc
ll /etc/alternatives/g*
sudo update-alternatives --remove-all gcc
sudo update-alternatives --remove-all g++
sudo update-alternatives --install /usr/bin/gcc gcc /usr/bin/gcc-13 10 --slave /usr/bin/g++ g++ /usr/bin/g++-13
g++ --version
gcc --version
I cloned the repository, created build directory, set environment variables and run CMake:
git clone https://github.com/baldurk/renderdoc.git
cd renderdoc/
mkdir build-android
cd build-android
export JAVA_HOME=~/dev/repos/graphicsprofiler/tools/buildtools/jdk
export ANDROID_SDK=~/dev/repos/graphicsprofiler/tools/buildtools/android
export ANDROID_NDK=~/dev/repos/graphicsprofiler/tools/buildtools/android/ndk-bundle/android-ndk-r20b
export PATH=$PATH:$JAVA_HOME/bin
cmake -DBUILD_ANDROID=On -DANDROID_ABI=armeabi-v7a ..
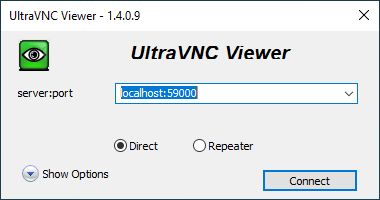
I followed this guide, run the following command from WSL:
ssh -L 59000:localhost:5901 -C -N -l dmitriano $VNC_IP
and was able to connect with UltraVNC client:
Installed FireFox browser as described here.
(more…)I simply installed:
sudo apt install ubuntu-desktop-minimal -y
sudo apt install xrdp -y
systemctl status xrdp
and was able to connect with Remote Desktop from Windows as root user:
Install magick tool:
sudo apt update
sudo apt install imagemagick
Copy *.png files to a folder, for example:
win16x16.png
win32x32.png
win48x48.png
win64x64.png
and run the following command:
convert *.png winapp.ico
Run a docker container:
export MY_IP=$(curl -s https://api.ipify.org)

sudo docker run -it --rm --cap-add=NET_ADMIN -p 1194:1194/udp -e HOST_ADDR=$MY_IP --name dockovpn alekslitvinenk/openvpn
or
sudo docker run -it --rm --cap-add=NET_ADMIN -p 1194:1194/udp -e HOST_ADDR=$MY_IP --name dockovpn alekslitvinenk/openvpn -v openvpn_conf:/opt/Dockovpn_data
to persist generated files in volume storage.
Type Ctrl+P then Ctrl+Q to turn interactive mode to daemon mode.
Determine its IP address:
sudo docker ps
sudo docker inspect dockovpn | grep IPAddress
I installed required packages:
sudo apt install build-essential
sudo apt install libx11-dev
sudo apt install ninja-build
sudo apt install openssl libssl-dev
sudo apt install libmd4c-dev libmd4c-html0-dev
sudo apt install pkg-config
sudo apt install mesa-utils libglu1-mesa-dev freeglut3-dev mesa-common-dev
sudo apt install libglew-dev libglfw3-dev libglm-dev
sudo apt install libao-dev libmpg123-dev
When I switched to PHP 7.4 I forgot to specify sendmail_path parameter in php.ini and my contact form stopped working. Today I found sendmail_path parameter in PHP 7.0:
cd /etc/php
find . -name "php.ini"
./7.0/fpm/php.ini
./7.0/cgi/php.ini
./7.0/cli/php.ini
./7.4/fpm/php.ini
./7.4/cli/php.ini
grep sendmail ./7.0/fpm/php.ini
sendmail_path = "/usr/sbin/sendmail -t -f *****@yandex.ru -i"
Source file:
soxi short-borrowed-old.wav
Input File     : 'short-borrowed-old.wav' (flac)
Channels       : 2
Sample Rate    : 44100
Precision      : 16-bit
Duration       : 00:00:00.60 = 26460 samples = 45 CDDA sectors
File Size      : 54.0k
Bit Rate       : 720k
Sample Encoding: 16-bit FLAC
Comment        : 'Comment=Processed by SoX'